Using Windows Command Prompt Colours with Node Js
UPDATE: 5 years after the original post… Microsoft has improved the UI for the command prompt colours… by introducing the new “Windows Terminal”. It is in the Microsoft Store. Go and get it. It has json based config just like VS Code, easy colour schemes, and support for various shells, including command prompt, Powershell, Powershell Core, and Linux through Windows Subsystem for Linux (WSL)
I have happily used the Windows command prompt for years. As a matter of habit, I always change the font to Consolas 14pt and background colour to something a little less harsh than #000000. Usually a muted dark blue or green. When doing so, I’ve simply changed any one of the colour swatches to my desired colour and assign it to the “Screen Background” radio button. This seems to be how the dialog was designed, and it works fine when using standard windows command prompt. However, some recent tinkering with Node.Js made it all go horribly wrong.
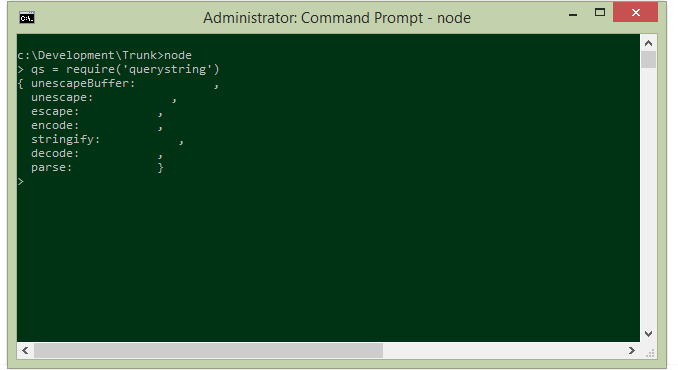
As you can see, some of the text from the output of the REPL session has disappearred into the background.

Above: My incorrect idea of how the colours dialog works
The reason is that my mental model of how the Command Prompt Properties ‘Colours’ tab works, was completely wrong.
According to my mental model, I…
- Pick a colour tile, any tile from the ‘palette’ of available colours
- Modify it using the RGB values
- Assign it the “Screen Background” radio button
- Job done! My everything looks great, until I use node
- Through lots of trail and error and looking at how Unix terminals treat colours, I”ve come to realise that not only is my mental model completely wrong, but this dialog box is really really badly designed.
This mental model works fine if you are only every using ‘DOS’ commands. But node was designed for Unix-y environments.
It turns out that windows command prompt has a lot more in common with Linux than I ever thought. It seems that these 16 colour chips correspond with the ANSI colours used by all terminals. They are not simply a colour palette to pick and choose from.
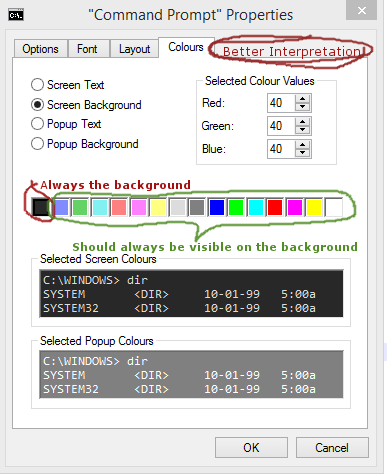
Above: A better mental model of how this dialog works
Therefore the correct way to use this dialog appears to be
- Select the first colour chip
- Change it to your background colour
- Make sure it is still assigned to the “Screen Background” radio button
- Ensure the next 7 colours are clearly visible on your background colour
- Note that I had to deselect the colour value box before switching to another ‘swatch’ or it would transpose the colour value I was editing onto the new swatch, making things really awkward.
Here is my colour scheme after 10 minutes of playing around. They are shown in the image.
| Colour ‘tile’ | R,G,B Colours | Base colour |
|---|---|---|
| 1 | 40, 40, 40 | Black – This tile should always be your background colour |
| 2 | 128, 140, 255 | Blue |
| 3 | 100, 210, 100 | Green |
| 4 | 128, 240, 240 | Cyan |
| 5 | 255, 128, 128 | Red |
| 6 | 255, 128, 255 | Magenta |
| 7 | 255, 255, 128 | Yellow |
| 8 | 220, 220, 220 | White – this tile should always be your text colour |
I’ve ignored the other 8 colours, I’ve yet to see them used.
If nothing else, this post is a reminder to me how this obscure dialog works. I suspect this dialog has been around since Windows 3! It would be a good exercise in UI Design to re-fashion it to better fit how it works.
Comments